🧩 Templating
NotificationAPI supports two ways to send notifications:
- Without templates (default): send content directly in the API request per channel.
- With templates: design once in the dashboard, send with dynamic parameters.
This page explains both methods and how to choose, plus default template behavior, multiple templates, and localization.
Without templates (direct content)
This is the default behavior. It lets you control sending and content directly through the API, no templates required. You provide the full payload for any channel you want to use in a single request.
- Email: provide the complete email structure by supplying raw HTML via
email.html, and set the subject viaemail.subject. This gives you full control over layout, styling, and content directly from your code. - SMS: compose the exact text body via
sms.message. The message sent will match what you provide. - In‑App: define the notification card by setting
inapp.title(headline),inapp.url(click action), andinapp.image(thumbnail/icon) to fully control the rendered item. - Web Push: set
web_push.title,web_push.message,web_push.icon, andweb_push.urlto define the push payload and the click-through destination. - Mobile Push: set
mobile_push.titleandmobile_push.messageto control the notification content shown on the device. - Call: pass the spoken text via
call.message. This content is read out to the recipient by the call provider. - Slack: pass
slack.textfor the message body and optionallyslack.blocksfor rich formatting with Block Kit.
See more details and multi-language examples in the Server (Back-end) reference.
With templates
Templates enable notifications to be created and updated in the visual template editor without code changes, great for content and design teams. Engineering simply sends the type and parameters. You design per-channel templates in the dashboard and trigger them by sending type (notificationId) and parameters.
await notificationapi.send({
  type: 'new_comment',
  to: {
    id: 'USER_ID',
    email: 'user@example.com',
    number: '+15005550006'
  },
  parameters: {
    comment: 'testComment',
    commentId: 'testCommentId'
  }
});- Pass dynamic data via
parameters. See Parameters (Merge Tags). - Optionally force a specific template with
templateId. See the Multiple templates section.
Default template behavior
- Each channel has a default template. If you don’t pass
templateId, the default template for that channel is used. - You can change defaults any time in the dashboard.
- If you pass a
templateIdthat doesn’t exist for a given channel, that channel falls back to its default and a warning is generated.
Multiple templates (variations and brands)
Use multiple templates for the same type to:
- Run copy/design variants (e.g., “You have updates” vs. “New updates for you”).
- White‑label for different customers.
- Use special templates for digests/batching.
- Localize into different languages.
Select a template at send time:
await notificationapi.send({
  type: 'order_tracking',
  to: { id: 'USER_ID', email: 'user@example.com' },
  templateId: 'weekly_digest_es',
  parameters: { firstName: 'Alba', orderId: '123456' }
});
Localization
“Localization” typically includes:
- Translating text (subject lines, body, CTAs).
- Locale-aware formatting of dates/times/numbers.
- Regional links/media; RTL layout when applicable.
Approaches:
- Separate template per locale (recommended)
const localeToTemplateId = {
  'en-US': 'order_confirmation_en-US',
  'es-ES': 'order_confirmation_es-ES'
};

const templateId =
  localeToTemplateId[user.locale] ?? 'order_confirmation_en-US';

await notificationapi.send({
  type: 'order_confirmation',
  to: { id: user.id, email: user.email },
  templateId,
  parameters: { firstName: user.firstName, placedAtIso: order.placedAtIso }
});- Conditional copy in one template (for small differences)
{% if locale == 'es-ES' %}
Hola {{ firstName }}
{% else %}
Hello {{ firstName }}
{% endif %}- Date/number formatting
Order placed on {{ placedAtIso | date: "%b %d, %Y %H:%M" }}Migrating Bee Templates
If you have existing email templates created with the legacy Bee editor, you can migrate them to our new, faster email editor. The migration process is safe and gives you full control:
How to Migrate
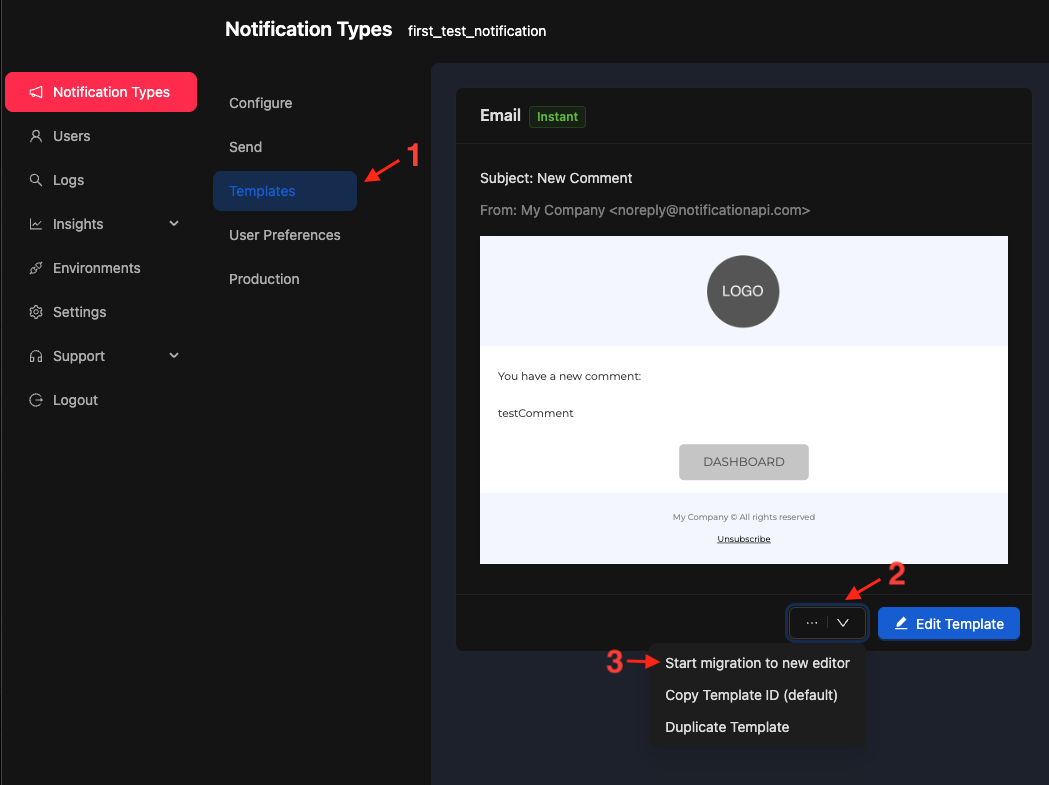
- Navigate to the Templates tab in your notification configuration
- Click the three-dot menu (⋯) next to the “Edit Template” button
- Select “Start migration to new editor” from the dropdown menu

What Happens During Migration
- Our AI automatically converts most of your template structure and content
- You’ll be able to review and customize the migrated template before finalizing
- Your original template remains unchanged until you explicitly confirm the migration
- The migration is not finalized until you select “Complete migration”
Important Notes
The migration is completely safe - your current template will remain unchanged until you explicitly confirm the migration by selecting “Complete migration”.
- You can back up your original even after starting the migration process
- Use the “Duplicate Template” option to create a backup before migrating
- Review the migrated template carefully to ensure all content and styling transferred correctly
- If you’re not satisfied with the migration, you can discard it and keep using your original template
Frequently Asked Questions
Can I use templateId with all channels?
Yes. If a channel lacks that templateId, it falls back to its default template for that channel.
Can I send without creating templates?
Yes. You can use direct content in the request without creating templates in the dashboard. See the Server reference for details on passing content directly.